
Login
Login
No fluff. Just free, new stuff. (Demos, credits, updates and the occasional thing we're proud of)
Thanks for subscribing! Stay tuned for demos, credits, and updates.

Staring at a stack of paper and dreading the scanner? The good news is that "document scanning" has quietly changed. You no longer need a flatbed, a USB cable, and a free afternoon. Today, the phone in your pocket plus a free app can capture a page, straighten it, read the text, and drop it into a searchable PDF — often without you touching a single setting.
This guide walks through what automated document scanning actually means, how the automation works behind the scenes, and how to set it up for the way you really work. No enterprise budget required, and no special hardware to buy.
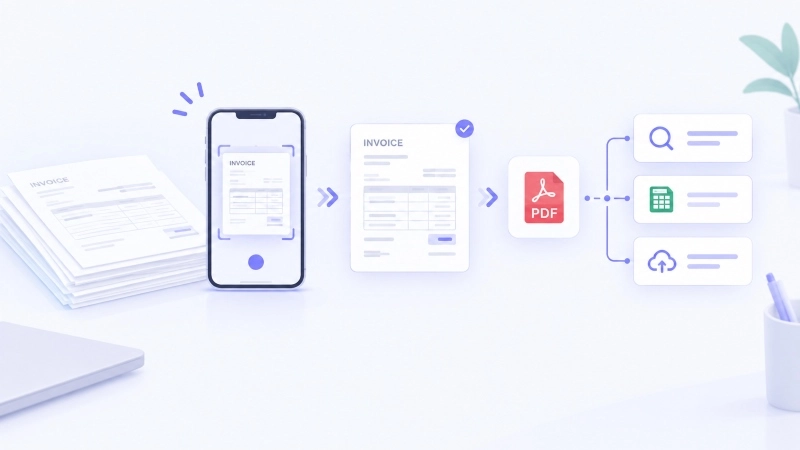
A decade ago, scanning meant feeding sheets through a machine one at a time and saving each as a separate file. "Automated" now describes something broader: software that handles the tedious parts for you. After you snap or scan a page, it can automatically crop the edges, fix the tilt, sharpen the contrast, recognize the text, and even sort the file into the right folder. You do the pointing; the software does the rest.
The term covers two related but different things, and knowing which one you need saves a lot of confusion:
Personal scanning automation is what most people mean day to day. You photograph a receipt, a form, or a whiteboard with your phone, and an app cleans it up and turns it into a PDF. The "automation" lives in the auto-crop, the auto-straighten, and the built-in text recognition. It removes the manual cleanup that used to make scanning feel like a chore.
To make the shift concrete: the old way was to place a sheet on a flatbed, press scan, wait, save a file, crop it by hand, rename it, and repeat for the next page. The automated way is to hold your phone over the page, let the app snap and fix it, and move on — the renaming and filing happen in the background. Same result, a fraction of the effort.
Business document capture is the heavier version. A high-speed scanner, stacks of mixed paperwork, and software that splits batches, reads invoice numbers, and routes files into the right system. It is genuinely useful if you process hundreds of documents a week — but it is overkill for a home office or a small team.
For the rest of this article, we focus on the personal and small-team side, because that is where the biggest, fastest time savings show up for most readers. If you later find yourself drowning in paper, the enterprise tools build on the exact same four steps below.
Understanding the pipeline helps you pick the right tool and fix problems when scans come out wrong. Every automated scanning flow, from a free phone app to a departmental scanner, runs through four stages.
Step 1 — Capture the Page
This is the moment you point a camera or scanner at the document. On a phone, modern apps detect the page edges as you hover and snap automatically once the frame is steady. On a desk, a scanner with an automatic document feeder (ADF) pulls a whole stack through without you feeding each sheet by hand. The goal at this stage is simply a clean, high-resolution image of every page.
Step 2 — Auto-Enhance the Image
Raw photos of documents look rough: skewed angles, shadows across the page, a fingertip in the corner. Enhancement fixes all of that. The software crops to the page boundary, straightens the tilt (a step called deskew), removes shadows and noise, and boosts contrast so the text pops. Good enhancement is the difference between a scan you can read at a glance and one you squint at for ten minutes.
Step 3 — Recognize the Text with OCR
Optical character recognition, or OCR, is what turns the picture of words into actual, selectable text. Once OCR runs, you can search the PDF for a phrase, copy a sentence, or hand the file to another tool to read. A scan without OCR is just an image — it looks fine, but it is blind to search. This step is what makes a scanned document genuinely useful later.
Step 4 — Organize and File Automatically
The last stage is where "automated" actually pays off. Instead of naming files by hand, the software can pull a date or an invoice number from the text and use it as the filename, then drop the PDF into a folder. Some apps sync straight to cloud storage so the document is already wherever you need it. Skip this step and you trade paper clutter for digital clutter — a folder full of "scan001.pdf" that nobody can navigate.
One choice worth making here is the output format. A searchable PDF (image plus a hidden text layer from OCR) is the flexible default: you can read it, search it, and feed it to another tool later. A plain image PDF looks identical on screen but locks the text away. If you are archiving for the long term, some tools offer PDF/A, a preservation format designed to stay readable for decades — handy for tax records and contracts you might need years from now.
The right setup depends less on the "best" app and more on where and how you scan. Here are the three common situations and a sensible starting point for each, with one tool that does the job well.
If most of your scanning happens away from a desk — receipts after a trip, a signed page at a client's office, a slide from a meeting — your phone is the tool. Adobe Scan is a strong default: it detects page edges, corrects perspective, and runs OCR so the result is a searchable PDF you can send or store. Microsoft Lens is the equivalent choice if you live in Microsoft 365, since it can push scans straight into OneDrive or Word. Both are free, both handle the auto-crop-and-straighten for you, so a slightly wobbly photo still comes out clean. The catch is that OCR quality depends on lighting, so a dim corner will cost you some accuracy.
When the job is a shoebox of bank statements or a folder of old contracts, a real scanner plus desktop software beats a phone. NAPS2 is a free, open-source option for Windows and Linux that handles batch scanning and OCR across many languages — ideal when you just want the paper gone and searchable. If accuracy matters more than price, ABBYY FineReader PDF is the recognition leader, with layout understanding that keeps tables and headings intact, which matters when you later need to edit or quote the text. The trade-off is cost and a steeper learning curve, so it makes sense only once volume or precision justify it.
The annoyance after scanning is rarely the scan — it is the filing. Tools built around workflows, such as SwiftScan, let you set naming templates and auto-upload rules so a scanned document lands in the right cloud folder with the right name, no manual renaming. Even a lighter setup helps: capturing into one dedicated cloud folder (OneDrive, Google Drive, or Dropbox) means the document is already where you will look for it later. The point is to decide the destination once, not every single time.
This is the step most guides skip, and it is the one that matters most once the paper is gone. Automated scanning gets your documents into neat, searchable PDFs — but a PDF full of text is not the same as knowing what is in it. The information is still trapped inside the file until someone reads it, pulls out the key points, or checks it against something else.
That gap is where the next layer of automation earns its keep. Once a document is digital, you can summarize a 40-page scanned report into a half-page brief, extract the action items from a meeting whiteboard, or compare two versions of a contract without re-reading both. Doing that by hand defeats the point of scanning in the first place — you digitized the paper, then buried yourself in reading it.
We're building that next layer at iBoomto. The iBoomto AI desktop client reads scanned pages with built-in OCR and then summarizes a 40-page report into a half-page brief, or pulls the action items out of a meeting whiteboard — so a scanned contract, report, or form becomes something you can actually use without re-reading it. The scanning gets the paper out of your life; the summarization gets the meaning out of the file.

 Free Download Now
Automation handles the editing, but it cannot fix a bad photo. A few habits keep the whole pipeline running smoothly and spare you from rescanning later.
Use flat, even lighting. Shadows and glare are the top causes of OCR errors, so daylight near a window beats a single overhead bulb. Place the document on a flat, high-contrast surface — a white page on a dark table helps the edge detector find the borders quickly. Keep the camera parallel to the page; tilt is fixable, but less tilt means less distortion to correct afterward.
Always turn on OCR, and confirm the output is a searchable PDF rather than just an image. If you cannot select the text after the scan, OCR did not run.
Finally, name and file as you go by setting one folder as the landing spot, so scans never pile up unsorted on your desktop.
Automated document scanning is less a purchase than a habit. Start with the tool you already have — your phone. Let it crop, straighten, and recognize the text, then send the PDF where you will find it later. And remember the last step that most people miss: a scanned PDF is only the beginning. The real win is turning those files into something you can use, which is exactly the kind of document processing we are building toward at iBoomto AI.